A blog about Southern,Country, simple, and down to earth cooking. Mostly thrifty and sometimes "experimental."
Sunday, August 14, 2011
Chocolate Velvet Pound Cake
I have never really baked cakes from scratch. Opening a box of cake mix was and is a sure fire way to go at times.
My son's 10th birthday is coming up, and we will be out of town on his special day. He will be leaving the single digits and leaping into double digits and I wanted to attempt a special cake just for him.
Recently a friend (thanks Judy!) gave me lots of new cookbooks.My son and I looked together through several cookbooks and he picked out a Chocolate Velvet Pound cake. It should be called a Sinful, blissful,soul satisfying Chocolate Velvet pound cake!
I sliced up a few strawberries to keep it healthy...HaHaHa. They went very well with the rich chocolate explosion!
Chocolate Velvet Pound Cake (Southern Living)
Ingredients
1 1/2 cups semisweet chocolate morsels
1/2 cup butter, softened
1 (16-ounce) package light brown sugar
3 large eggs
2 cups all-purpose flour
1 teaspoon baking soda
1/2 teaspoon salt
1 (8-ounce) container sour cream
1 cup hot water
2 teaspoons vanilla extract
Powdered Sugar
Preparation
Melt semisweet chocolate morsels in a microwave-safe bowl at HIGH for 30-second intervals until melted (about 1 1/2 minutes total time). Stir until smooth.
Beat butter and brown sugar at medium speed with an electric mixer, beating about 5 minutes or until well blended. Add eggs, 1 at a time, beating just until blended after each addition. Add melted chocolate, beating just until blended.
Sift together flour, baking soda, and salt. Gradually add to chocolate mixture alternately with sour cream, beginning and ending with flour mixture. Beat at low speed just until blended after each addition. Gradually add 1 cup hot water in a slow, steady stream, beating at low speed just until blended. Stir in vanilla. Use immediately, following directions for desired cake.
Note: The addition of hot water at the end of this recipe makes for an exceptionally moist cake.
Spoon batter evenly into a greased and floured 10-inch tube pan. Bake at 350° for 55 to 65 minutes or until a wooden pick inserted in center comes out clean. Cool in pan on a wire rack 10 minutes. Remove from pan, and let cool completely on wire rack.
Sift powdered sugar over top of cake.
Chocolate Ganache: (Southern Living)
Ingredients
1 (12-oz.) package semisweet chocolate morsels
1/2 cup whipping cream
3 tablespoons butter
Preparation
1. Microwave semisweet chocolate morsels and whipping cream in a 2-qt. microwave-safe bowl at MEDIUM (50% power) 2 1/2 to 3 minutes or until chocolate begins to melt. Whisk until chocolate melts and mixture is smooth. Whisk in butter, and let stand 20 minutes.
2. Beat at medium speed with an electric mixer 3 to 4 minutes or until soft peaks form.
Friday, February 18, 2011
Lentil Curry Soup
I haven't much experience with lentils. They have not landed on my dining room table very often. My lentils have sat in their storage container for some time and I have wondered "What to do" with those lentils.
In the mood and really in the "need" for something healthy I thought I would give those forgotten lentils a try.
I just used what I had handy and this soup was delicious. It had just enough spice and lots of veggies.
The Recipe:
2 cups dry lentils
3 carrots chopped
3 stalks of celery chopped
2 Cups diced tomatoes
1 onion chopped
6-8 cups chicken stock or water
3 cloves garlic minced finely
2 cups fresh spinach rinsed and chopped
1 teaspoon black pepper
1 teaspoon crushed red pepper flakes
1/8 teaspoon ground ginger
2 teaspoons curry or to taste
2 tablespoons olive oil
salt to taste
Rinse lentils and “pick” for debris. Place in stock/soup pan and add chicken stock. Bring to a boil and lower heat to simmer for 20 minutes covered.
Meanwhile heat olive oil in skillet, add carrots, celery,tomatoes,spinach, onion, garlic, pepper flakes, ginger, and curry. Stir and cook until onions are clear.
Add vegetable mixture to lentils, cover and simmer for an additional 20 minutes.
Remove from heat, serve with rice underneath or mmmm mixed in...
Thursday, February 17, 2011
Fiery Angel Hair Pasta
I decided to join in over at IHCC this week. This week's theme is "Use Your Noodle". The featured Chef is Giada De Laurentiis.
After reading through some of her recipes I decided to prepare Fiery Angle Hair Pasta.
The recipe uses chili oil, a little cheese, parsley and angel hair pasta. I added chicken breast that was already prepared and waiting to be used in the freezer and chopped bell pepper.
I LOVE garlic and sauteed it along with the bell pepper and chicken.
There was also instructions on how to prepare chili oil, which I had never prepared.
I did half the lemon used in this recipe.
The dish was great and each bite had a nice touch of heat.
Next time....I see shrimp in my angel hair.
Fiery Angel Hair Pasta by Giada De Laurentiis:
Ingredients
- 1 pound angel hair pasta
- 1/2 cup Chili Oil, recipe follows
- 1/2 cup chopped fresh Italian parsley leaves
- 1 lemon, juiced
- 2 tablespoons lemon zest
- Coarse sea salt
- Dried crushed red pepper flakes
- 1/2 teaspoon grated lemon peel, optional
- 2/3 cup freshly grated Parmesan
Directions
Bring a large pot of salted water to a boil. Add the angel hair pasta and cook until tender but still firm to the bite, stirring occasionally, about 6 to 8 minutes. Drain, reserving 1 cup of the pasta water.
Stir the oil, parsley, lemon juice and lemon peel in a large serving bowl. Add the cooked pasta and toss with enough reserved pasta water, 1/4 cup at a time, to moisten. Season the pasta with salt and red pepper flakes, to taste. Sprinkle grated lemon peel over pasta for extra flavor and texture. Sprinkle with the Parmesan and serve.
Chili Oil:
- 2 cups olive oil
- 4 teaspoons dried crushed red pepper flakes
Combine the oil and crushed red pepper flakes in a heavy small saucepan. Cook over low heat until a thermometer inserted into the oil registers 180 degrees F, about 5 minutes.
Remove from heat. Cool to room temperature, about 2 hours. Transfer the oil and pepper flakes to a 4-ounce bottle. Seal the lid. Refrigerate up to 1 month.
Yield: 2 cups
Prep Time: 2 minutes
Cook Time: 5 minutes
Inactive Prep Time: 2 hours
Remove from heat. Cool to room temperature, about 2 hours. Transfer the oil and pepper flakes to a 4-ounce bottle. Seal the lid. Refrigerate up to 1 month.
Yield: 2 cups
Prep Time: 2 minutes
Cook Time: 5 minutes
Inactive Prep Time: 2 hours
I am also sending my post to Presto Pasta Nights 2011.
Sunday, February 13, 2011
Mustard Rubbed Fried Pork Chops
Iron skillets just get better with age.
Most things do.
We have those great, heavy, seasoned iron skillets that are passed down from our Grandmothers and those special to us.
I have a few rescue skillets that were resuscitated by cleaning and seasoning with TLC.
New iron skillets are purchased, with the anticipation of the beginning of a family heirloom.
I pulled "Old Betsy" out and decided to put a good scald on some pork chops.
This recipe is wonderful. It tenderizes and marinates at the same time. The hint of mustard with each bite is very nice too. I have used Prepared Mustard in the past and this works wonderfully.
Really any spice would work. Ideas of Cumin or curry or floating about in my thoughts and on my palate as I type.
The Recipe:
6-8 Pork Chops
1 Teaspoon seasoned salt
2 Teaspoons Garlic Powder
2 Teaspoons Onion Powder
4 Tablespoons Dijon Mustard
2 Teaspoons Paprika
1 Teaspoon Black Pepper
2 Cups all purpose flour
½ cup or so of Vegetable Oil
Rinse pork chops and pat dry. Line a plate or flat pan with foil or parchment paper.
Mix: seasoned salt. Garlic powder, Paprika, Pepper.
Add Prepared Mustard to spice Mixture.
Mix well and apply to both sides of pork chops.
Dredge pork chops in one cup of flour. giving a fine layer of coating.
Refrigerate for one hour.
Heat oil in a heavy skillet until at a good frying temperature.
While oil is heating, dredge chops again in reserved flour.
When oil is hot and pork chops to skillet. Careful not to overcrowd, fry a few at a time.
Cook for approximately ten minutes on each side. Remove and drain on paper towels.
Thursday, February 10, 2011
I HEART Biscuits!
I learned how to make biscuits as a young girl, standing beside my Maw Maw. She never measured, and neither did I. We always "eyeballed" it and the results were always wonderful.
As the years progressed and life became busy,I left behind Maw Maw's recipe. I began to use self-rising flour. White Lily to be exact. White Lily is a Southern Standard in most homes here in the south. Results were always good. However, they were not my Maw Maw's biscuits.
Today, I read a recipe that is VERY Similar to the one Maw Maw would use most days, early in the morning before the day became too busy or too HOT. I wish I could remember her exact eyeballing it measurements.
I happened to just glance at the heart shaped cookie cutter that has taken space for awhile now and thought. "I'll make heart biscuits." After all, this is the month for love. Well the month that it is official. I like to think everyday is a day for love.
Using Alton Brown's Recipe for Southern Biscuits took me back to my Maw Maw's kitchen once again. Isn't just a wonderful thing how food can bring back warm feelings of the past back to us.
The recipe is simple and I did measure!
I left the buttermilk, shortening and butter in the fridge until the last minute.
Handling biscuit dough with care is very important. You have to hold yourself back from kneading. Always remember gentle touches, yields heavenly fluffiness.
I made two batches of biscuits. Heart Shaped and the other batch "big ole cat heads"
My baking time was 12 minutes. Oven temperatures are not all alike. After 10 minutes I would do a peek and check.
The recipe was great.."Make your tongue slap your cheek and ask for more!"
SOUTHERN BISCUITS: (Alton Brown)
Ingredients
* 2 cups flour
* 4 teaspoons baking powder
* 1/4 teaspoon baking soda
* 3/4 teaspoon salt
* 2 tablespoons butter
* 2 tablespoons shortening
* 1 cup buttermilk, chilled
Directions
Preheat oven to 450 degrees.
In a large mixing bowl, combine flour, baking powder, baking soda and salt. Using your fingertips, rub butter and shortening into dry ingredients until mixture looks like crumbs. (The faster the better, you don't want the fats to melt.) Make a well in the center and pour in the chilled buttermilk. Stir just until the dough comes together. The dough will be very sticky.
Turn dough onto floured surface, dust top with flour and gently fold dough over on itself 5 or 6 times. Press into a 1-inch thick round. Cut out biscuits with a 2-inch cutter, being sure to push straight down through the dough. Place biscuits on baking sheet so that they just touch. Reform scrap dough, working it as little as possible and continue cutting. (Biscuits from the second pass will not be quite as light as those from the first, but hey, that's life.)
Bake until biscuits are tall and light gold on top, 15 to 20 minutes.
This is my entry for Foodie Friday hosted by http://designsbygollum.blogspot.com/
Tuesday, February 1, 2011
Hoppin' John Hopped onto a Waffle
Hoppin' John hopped onto a Waffle!
I love black eyed peas served with cornbread. I wanted to dress up my peas and decided to prepare my version of Hoppin' John. Hoppin John is a Southern Dish and there is not one certain way or recipe to prepare this satisfying meal. Everyone has their own recipe. "It's ALL good!"
Traditional Hoppin John is prepared with ham hocks, bacon or fatback. I had none of these handy, and to avoid a trip to the grocery store, I used bone in pork chops. After cooking in the slow cooker they fell apart and away from the bone. I did not need to pull the chops apart, they were so soft and tender they fell apart into chunks of goodness all throughout the peas.
I used dried black eye peas. However,canned peas would work just as well. Just remember to rinse peas. Careful not to over cook the dried peas as they will become mushy and if this happens, you can drain the cooked peas into a colander and rinse the "mush" away. But do this before you add the spices and vegetable mixture.
The greens were from a batch I had prepared a few weeks ago and froze. If fresh greens are used, rinse greens several times, and pull each leaf away from the thick center vein, roll up like a cigar and chop. Canned collard greens would work well in this dish too.
The cornbread waffles were the best companion for this dish. All the juice settled into the squares of the waffle and with each bite of the Hoppin' John you got a bite of cornbread too!
The Recipe:
Hoppin’ John
1 pound of dry Black Eyed Peas
1 pound Smoked Sausage
2 bone in Pork Chops
1 large Onion chopped
3 stalks of Celery chopped
1 green Bell Pepper chopped
2 cups diced Tomatoes (fresh or canned)
2 cups Collard greens rinsed, and chopped thin
2 cups Rice
2 Bay Leaves
4 cloves Garlic chopped
2 teaspoons Red Pepper Flakes
1 teaspoon dried thyme
salt and pepper to taste
2 Tablespoon Canola Oil
Pick the peas, or “Look” the peas. Soak covered in cold water overnight or for 6-8 hours.
Place peas, bone in pork chops, greens and 2 bay leaves into slow cooker. Cover chicken stock or water. Cook on low setting for 6-8 hours. Careful not to overcook peas.
When peas have two hours or so left to cook; Heat 2 tablespoons of oil in a skillet, add onion, garlic, celery, smoked sausage, bell pepper, tomatoes, red pepper flakes, thyme, salt and pepper to taste. Cook until onions are clear and the veggies begin to soften.
Using a ladle remove bones from the cooked pork chops in peas. Add skillet mix to crock pot and mix into peas, stirring gently.
Continue to cook for the last two hours on low.
Cook white rice per directions.
CORNBREAD WAFFLES:
2 large eggs
1 ½ cups buttermilk or any milk
1/4 cup vegetable oil
1 1/2 cups Self rising corn meal ( I prefer yellow)
1 cup all purpose flour
Preheat waffle Iron.
Mix all ingredients. I use a little more milk for cornbread waffles. They seem to turn out better if you can somewhat “pour” the batter onto the waffle iron.
Close waffle iron and leave for about 5 minutes. Check and cook until firm and golden.
Place waffle on plate, top with rice and spoon the peas from slow cooker on top.
Yum!
Saturday, January 29, 2011
Pork Loin Stuffed with Ham, Swiss and Dill Pickles
I saw this recipe a few weeks ago on television and thought;”Oh my that looks delicious”.
I had a pork loin in the freezer and all of the ingredients handy, so today a “star” was born in my kitchen!
The original recipe calls to simmer on the stove top covered. I wanted to try it out in the oven and it worked great. I also wanted a somewhat Cuban sandwich flair to my pork this weekend so added cumin and dill pickles inside of the ham and cheese rolls. The swiss held up really well. I made sure it was really cold when I rolled it. The recipe calls to cut into the roast along the width of the roast. I sliced length wise so that when slicing after it was cooked, each slice would have a taste of the ham,cheese and pickles.
The sauce absolutely made this dish. It was very savory and satisfying. I served it with rice and green peas and to “Sop” up the sauce I baked Honey Wheat bread.
The recipe:
(Adapted from Melissa d’Arabian)
Kosher salt and freshly ground black pepper
1 (2 pound) boneless pork loin roast
4 slices deli ham
4 slices Swiss or gruyere cheese
3 tablespoons vegetable oil
2 carrots, chopped
1 onion, chopped
2 teaspoons all-purpose flour
1 cup white wine
1/4 cup chicken stock
2 teaspoons dried thyme
8 ounces small white mushrooms, halved
1/4 cup sour cream
1 tablespoon finely chopped fresh parsley
I also added a sprinkle or two of cumin and garlic powder before browning.
Inside of each ham and cheese roll I added a few dill pickle chips.
Liberally salt and pepper the pork loin on all sides. On a sturdy work surface, slice the pork roast 4 times evenly, about 3/4 of the way down the roast.I sliced into the pork four times down the length of the loin so that each slice of pork would have a taste of the ham and cheese. Wrap each ham slice around each cheese slice and place 1 into each of the 4 cuts. Tie the roast with kitchen string, or secure the roast closed with toothpicks. In a Dutch oven, heat 1 tablespoon oil over medium-high heat. Sear the pork loin quickly so that the roast gets color, but the cheese doesn't melt. Remove the roast and set aside.
Add the carrots and onions to the pan and cook until the onions are translucent and the vegetables are softened. Add the flour and stir to mix. Deglaze with the wine, and add the roast back into the pan along with the chicken stock and thyme. Season with salt and pepper.
Bake at 350 degrees for about an hour and 15 minutes.
Remove the roast from the pan once it's cooked and reduce the sauce for 5 minutes. Meanwhile, heat a large saute pan over high heat, add the remaining 1 tablespoon oil and then the mushrooms. Toss to coat in the oil and season with salt and pepper, to taste. Cook the mushrooms until they are golden, then add to the sauce. Whisk in the sour cream to the sauce. Slice the pork roast and serve with sauce poured on top. Garnish with parsley.
I am also linking to Sunday Suppers
Thursday, January 27, 2011
Tomato Stew with Dumplings....For the "Mater" lover
There are only a few days left for National Soup Month!
I wanted an easy and quick soup and decided to prepare a tomato "stew" with dumplings. Sometimes pronounced "Maters with dumplings".
This recipe is very thrifty and not too bad for the waist. It is a tomato lovers dish!
In prior pots of Mater Dumplings, I have used fire roasted tomatoes, plain tomatoes, and salsa style tomatoes. In the past I have also added other veggies and even chicken. The possibilities are endless. The warm,spoonfuls of this soup and the bites of the fluffy dumplings are ever so comforting.
Have I mentioned how easy and quick it is to prepare?
The soup/stew will thicken as it cooks and becomes somewhat velvety after the dumplings are added.
The Recipe:
For Tomato “stew”:
2 cans of Stewed tomatoes
2 cans of Tomato Sauce
1 Onion Diced
1 tablespoon butter
Basil or Oregano to taste
Salt and Pepper to taste
For Dumplings: (same recipe I use for my Chicken and Dumplings)
2 cups all purpose flour
1 tablespoon of baking powder
1 teaspoon salt
3 teaspoon unsalted butter
1 cup milk
Place stewed tomatoes and tomato sauce in medium to large pot, bring to a slow simmer.
Meanwhile melt butter and sauté onions and add Basil. Oregano or any flavoring you enjoy. When onions become translucent, place into pot with simmering tomatoes and sauce.
Simmer and turn down heat so that tomatoes are at a slow simmer.
Prepare dumplings:
Blend flour, baking powder and salt then set aside.
In a microwave safe dish place 3 tsp unsalted butter and 1 cup of milk. Melt butter and heat milk. Do not over heat.
Remove from microwave and mix into dry ingredients until a dough forms and is smooth in consistency.
Allow dumpling dough to rest 10-15 minutes
With a teaspoon, gather up a mound of dumpling dough and drop into simmering stew. Continue doing so until entire top of stew is covered with floating dumplings. Place a lid tightly on pot and cook dumplings for 10 mins.
Remove lid. Flip each dumpling over with a spoon and sprinkle herb of choice, salt and pepper on top of dumplings. Place lid back on pot and cook 5 more minutes.
Do not stir the stew once dumplings have been placed. Stirring may cause the dumplings to fall apart.
Saturday, January 22, 2011
Roasted Brussel Sprout Salad
I am attempting to incorporate more healthy foods into my diet. I‘m on the fence you might say. While not over doing it on the butter, I am not going to survive on oats and greens alone! I am a Southerner and Southerners enjoy cooking and eating! While everything I cook will not be diet friendly, I can always practice portion control! HaHaHa.
I wanted something crisp and refreshing for lunch today. Brussel Sprouts are in season and I had picked up some on my last trip to the grocery store. I am a huge fan of the sprout.
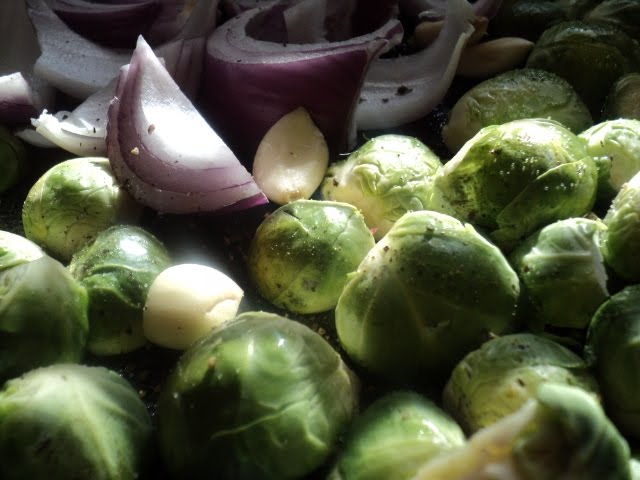
What to do, What to do, What to do with these Brussel sprouts? I pondered as I looked at their leafy shells and decided I did not want to boil them. I did decide to roast and throw in some other items that I had handy in the kitchen.
The Recipe:
1 lb Brussel sprouts trimmed and cut in half
½ Red Onion cut into thick slices
5 Cloves of Garlic peeled
1 cup chopped Roasted Pepper
1 slice Deli Ham sliced about 1 inch thick, browned in skillet using non stick cooking spray
Salt and Pepper to taste
Enough oil to lightly grease pan
Preheat oven to 425 degrees
Place Brussel Sprouts cut side down onto a flat baking pan
Scatter onion slices among Brussel sprouts
Place garlic cloves onto pan
Place into oven and roast for 15 minutes.
Remove from oven and move Brussel sprouts, onions and garlic around in pan. Trying to “Flip” all of sprouts.
Roast for another 10 minutes or so and remove from oven. Allow to cool.
While sprouts are roasting prepare vinaigrette:
1 zest of lemon
Juice from 2 lemons
2 tablespoons of apple cider vinegar
¼ cup of honey
1/3 cup Extra Virgin Olive Oil
1 Tablespoon Dijon Mustard
Salt and pepper to taste
In bowl add: Zest of lemon, Lemon juice, Apple Cider Vinegar, Honey, Extra Virgin Olive Oil, Dijon Mustard and whisk.
Slowly, whish in olive oil, add salt and pepper to taste. Set aside.
Remove roasted sprouts from pan and place in a large mixing bowl.
Dice roasted garlic and onions and add to bowl.
Toss in browned ham, diced roasted red peppers and drizzle vinaigrette mix thoroughly.
P.S. This salad is great warm or cold!
Sunday, January 16, 2011
Chicken Popovers
Winding down after the weekend I decided to make chicken popovers. They are quick, easy on the budget, and very much satisfying.
I used chicken that I had prepared a few weeks ago and had in the freezer. A rotisserie chicken would work great with this recipe and save time as well.
Carrots would go right along with this recipe. Really any veggie could sneak into this recipe.
The Recipe:
To Make the Popovers:
1 cup flour
¼ Teaspoon Salt
¾ cup milk
¼ cup cold chicken broth
2 eggs
Preheat oven to 450 degrees. Generously grease muffin pan or a popover pan. Place into preheating oven to preheat. Combine flour, salt, milk, broth and eggs in a food processor or a blender. Mix until smooth.
Spoon mixture into preheated pan, about two thirds full.
Bake 40 or so minutes. Popovers should be brown, puffed and firm to touch.
Remove from oven and cool.
To make the filling:
4 Tablespoons butter
2 Tablespoons butter (for sautéing mushrooms, bell pepper, and garlic
1/3 cup flour
¼ teaspoon ground thyme
Dash or two of pepper
1 cup chicken broth
1 cup evaporated milk
½ pound mushrooms, quartered and sauteed in 2 Tablespoons of butter browned
½ bell pepper diced and sauteed with mushrooms
2 cloves garlic minced and cooked with mushrooms and bell pepper.
1 cup frozen peas
½ small jar of pimentos
3 cups chopped, cooked chicken
Salt to taste
Saute mushrooms, bell pepper, and garlic in two tablespoons of butter until mushrooms turn a nice golden brown. Set aside.
In a large saucepan melt 4 tablespoons of butter, whisk in flour, thyme, and pepper. Continue to cook, stirring a few minutes, careful not to brown.
Slowly add and whisk in chicken broth, evaporated milk.
Continue cooking until mixture becomes thick, about 5 minutes.
Add mushroom mixture, chicken, pimentos and frozen peas and continue to cook and stir for 5 minutes.
Split popovers open and fill with the chicken filling and serve.
Thursday, January 13, 2011
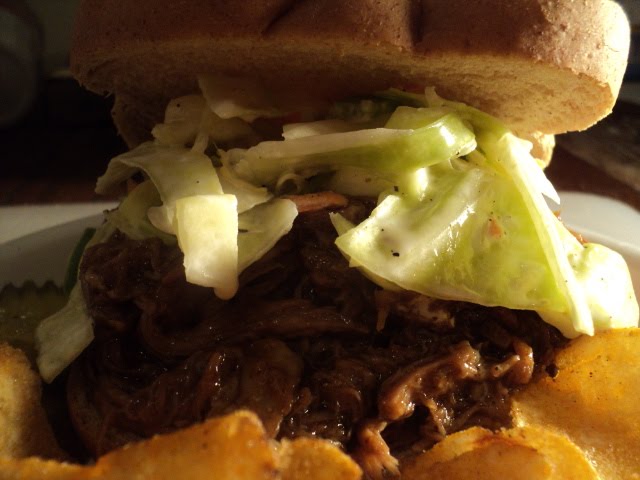
BBQ PORK AND SLAW - Lazy Day Cooking
We STILL have snow and ice here in Georgia! I think snow is beautiful when it falls from the sky and is gorgeous the first day it lays and decorates the landscape. However, 4 days later it isn’t looking so pretty!
Snow always makes me want to cuddle up and do absolutely nothing. Alas, the boys have to eat and that ruins my lazy snow day. I love to cook. However, that warm quilt and soft sofa called out to me and won on this cold, snowy day.
I walked into the kitchen with memories of my warm quilt on the sofa and missed it instantly. So I searched the freezer and fridge and thought; It’s a lazy snow day and It’s going to be a lazy cooking day!
Deciding on a BBQ Pork Roast prepared in my slow cooker; I searched for the makings of slaw and began to prepare dinner, HOURS in advance. It only took a few minutes to mix, rub, cut, dice and stir and I turned off the kitchen light and returned to my sofa and quilt.
Hours later, on went the kitchen light and with a few minutes of preparation dinner was ready.
The Recipe:
Pork Roast rinsed
1 large onion cut into thick slices
3-4 Cloves of garlic minced
BBQ Sauce
The Rub:
2 Tsp. Cumin
2 Tsp. Garlic Powder
2 Tsp Onion Powder
2 Tsp Chili Powder
2 Tsp Black Pepper
2 Tsp. Salt
2 Tsp. Red Pepper Flakes
Place thick slices of onion into bottom of slow cooker and turn heat on high.
Mix spices for rub and apply generously over entire pork roast.
Place roast into cooker and cover. Cook on high for 4-6 hours and low for 8-10.
At the last hour of cooking I throw in the garlic and sometimes add more red pepper flakes.
When finished, remove from cooker, allow to cool and “tear” meat. It will be juicy and falling apart. I also strain the cooking juices and throw the onion into the meat as well.
Add BBQ sauce. Just enough for your personal taste. I like a very “wet” BBQ. (This was a quickie recipe, so I used bottled sauce.)
Southern Cole Slaw:
1 Head of Cabbage (Small for a few folks, A large head of cabbage if you feed a large group of males like I usually do).
1 Bell Pepper diced
1 Onion diced
2 Tablespoons Celery Seed
1 Cup Apple Cider Vinegar or plain white vinegar
½ Cup Sugar (I like my slaw tangy, can add more sugar if you prefer “sweet slaw”)
1 Tablespoon of Oil
2 Tablespoons of Salt (less salt if you use less cabbage)
½ Tablespoon of Black Pepper
½ Cup of Mayonnaise - (All depends on how creamy one likes their slaw)
Mix all ingredients together and chill for a few hours or overnight in the fridge.
Load BBQ pork onto a bun, or bread of choice. We prefer wheat bread. With bread you have more “acreage” to cover.
I always top my BBQ with the slaw. It’s very yummy that way.
Subscribe to:
Posts (Atom)