Pages

Saturday, June 26, 2010

Pan Roasted Corn and Tomato Salad


This week's theme at IHCC is summer-loving! Yes, summer has arrived. Here in Georgia this week it has been in the high 90's very humid and a scant amount of rain has blessed us. For this weeks IHCC theme, I chose Mark Bittman's Pan Roasted Corn and Tomato Salad, (yes, another salad, it's HOT in Georgia).


Summer cooking to me is easy, sometimes fast, and doesn't require the oven. This time of year allows us to cook from nature's delicious, summertime, vegetable bounty!

I scoured the local trade day early this morning before sunup and discovered that many local farmers were there and wow their gardens must be doing very well this growing season. Is there such a thing as vegetable bliss? I picked through the corn and chose a sweet corn and what we call a "mill" corn here. Sweet corn is what is recognized most. Its the scrumptious,bright,yellow corn that we slather with butter most often. "Mill" corn is white, not quite as sweet and is used most often in frying,roasting and in wintertime vegetable soups. I decided to use a mixture of both. I also selected locally grown, vine ripe tomatoes and these Tomatoes were gorgeous.
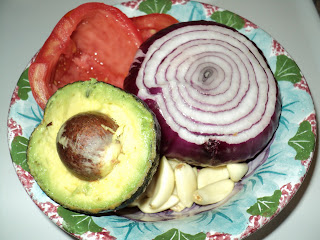
The recipe does not call for sweet bell peppers, however, I could not resist throwing in the bell peppers and some fresh garlic.Two Serrano peppers were seeded, chopped and tossed in as well.


The bacon was cooked,removed from the skillet and allowed to drain and cool. I also poured about half of the rendered fat out of the skillet before I added the corn and onions. I wanted to crumble the bacon into the salad.

~~I also soak the ears of corn in cold water, and the do a twisting motion with my hand under cold water to remove the silks. I have read that placing the corn, husks and all in a microwave for a few minutes will also help. Haven't tried this one yet. It does sound like a good idea.


This is one fresh, veggie loaded salad! Imagine the possibilities, anything could be added.


Pan Roasted Corn and Tomato Salad: Adapted from Mark Bittman


1/4 pound bacon, chopped

1 small red onion, chopped

4 to 6 ears corn, stripped of their kernels (2 to 3 cups)

Juice of 1 lime, or more to taste

2 cups cored and chopped tomatoes

1 medium ripe avocado, pitted, peeled and chopped

2 fresh small chilies, like Thai, seeded and minced

Salt and black pepper

1/2 cup chopped fresh cilantro, more or less.

1. Cook bacon in a large skillet over medium-high heat until it begins to render fat; add onion and cook until just softened, about 5 minutes, then add corn. Continue cooking, stirring or shaking pan occasionally, until corn begins to brown a bit, about 5 more minutes; remove from heat and let cool for a few minutes. Drain fat if you wish.

2. Put lime juice in a large bowl and add bacon-corn mixture; then toss with remaining ingredients. Taste, adjust the seasoning and serve warm or at room temperature.

Yield: 4 servings.

http://www.nytimes.com/2009/08/19/dining/191mrex.html?_r=3&ref=dining

Tuesday, June 22, 2010

CRAVING


Have you ever had a craving for something and that craving just would not subside until you indulged your craving?

Oh my I had my crave going on! Pizza was on "the brain" and my taste buds were on overdrive reminiscing about crust, garlic and cheese!

I honestly attempted to keep it healthy and made my own veggie pizza. I did borrow the dough recipe from Mark Bittman.

I topped the veggie heavenly pizza with: Olives, black and green, Tomatoes, artichokes, onion, mushrooms,garlic, mozzarella cheese and had just a smidgen of sauce. YUM...

My craving was satisfied!


Basic Pizza Dough (Mark Bittman)
You can knead this dough with a mixer (use the dough hook), or by hand, but I like the food processor best. The pizzas can be grilled or baked in an oven—the hotter the better (commercial pizza ovens I, are usually about 700°). This is the simplest, most basic pizza (and bread) dough you can make. Olive oil makes a smoother, more flavorful dough and a slightly cracklier crust—but You can omit it if you like—just add a little more water to the dough if you do.
Yield: Makes 1 large or 2 or more small pizzas Cooking Time: At least 1 hour, largely unattended
Ingredients
1 teaspoon instant or rapid-rise yeast
3 cups (about 14 ounces) all-purpose or bread flour, plus more as needed
2 teaspoons coarse kosher or sea salt, plus extra for sprinkling
1 to 1¼ cups water
2 tablespoons plus 1 teaspoon olive oil
Directions
1 Combine the yeast, flour, and 2 teaspoons salt in the container of a food processor. Turn the machine on and add 1 cup water and the 2 tablespoons of oil through the feed tube.
2 Process for about 30 seconds, adding more water, a little at a time, until the mixture forms a ball and is slightly sticky to the touch. If it is dry, add another tablespoon or two of water and process for another 10 seconds. (In the unlikely event that the mixture is too sticky, add flour, a tablespoon at a time.)
3 Turn the dough onto a floured work surface and knead by hand a few seconds to form a smooth, round dough ball. Grease a bowl with the remaining olive oil, and place the dough, in it. Cover with plastic wrap or a damp cloth and let rise in warm; draft-free area until the dough doubles in size, 1 to 2 hours. You can, cut this rising time short if you are in a hurry, or you can let the dough rise more slowly, in the refrigerator, for up to 6 or 8 hours.
4 Proceed with any recipe below, or wrap the dough tightly in plastic wrap and freeze for up to a month. Defrost in a covered bowl in the refrigerator or at room temperature.
To make this dough by hand: Combine half the flour with the salt and yeast and stir to blend. Add 1 cup water and: the 2 tablespoons olive oil; stir with a wooden spoon until smooth. Add remaining flour a bit at a time; when the mixture becomes too stiff to stir with a spoon, begin kneading, adding as little flour as possible-just enough to keep the dough from being a sticky mess. Knead until smooth but still quite moist, about 10 minutes. Proceed as above.
Notes
Crunchier Pizza Dough: This dough may be a little more difficult to handle but it has superior flavor and a pleasant crunch Substitute ½ cup cornmeal for ½ cup of the flour.
Six Quick Ideas for More Flavorful Pizza Dough
The options are infinite, but be careful; you want the dough to cook up crisp, and too many additions will make it soggy. You also want it to act as a flavor carrier not as the dominant flavor. But before adding the water to the dough, try the following, alone or in combination:
1. Add one-half to one teaspoon freshly cracked black pepper.
2. Add one tablespoon upureed cooked garlic (roasted is best) or one-half teaspoon minced raw garlic, on to taste.
3. Add one teaspoon to one tablespoon fresh herbs.
4. Substitute one-half cup to one cup whole wheat or semolina flour for the white flour.
5. Add one-fourth to one-half cup minced prosciutto, ham, or cooked bacon.
6. Use flavored olive oil, such as garlic or rosemary oil, in place of regular olive oil.

Saturday, June 19, 2010

Okra Salad


This week's theme at IHCC is Dining with Dad. I searched for a recipe that would remind me of Dad and one that he would enjoy.

My Dad is a do-it-yourself kinda guy. He rarely has dinner out and prefers to cook his own meals. I have to admit my step mother has not one problem with handing her kitchen over to Dad. He prefers simple, southern country cooking and he is an awesome cook!

I chose Mark Bittman's Okra Salad for this week's theme. When I was young Dad always planted a huge garden. I remember one year the garden consumed nearly all of our Atlanta suburban back yard! I also remember being handed a shovel to help unload the "fertilizer" that he would procure from the local stables. Dad grew tomatoes, peppers, squash,beans, onions,corn and okra. I am sure there were other odds and ends growing in his garden. I really remember the okra, because he grew so much of it and for many years I did not care for okra cooked any way other than fried.

The recipe is very easy and light on the wallet as well. I did not have access to the Chaat Masala. I wanted to make my own, and here in the mountains of Northwest Georgia, the ingredients just are not available. Alas, I made my own mixture with what I had and it tasted great.
I used fresh ground cumin, black pepper, salt, and cayenne.

The recipe does not call for flouring the okra. However, I am a southern girl and frying okra naked just isn't right. So I added some of the spice mixture I made to a ziploc bag, threw in some flour,the sliced okra and shook and coated the okra before frying. It was not a crusty okra but I believe the flour added some depth and more crunch. After I removed the okra from the skillet, I would sprinkle each batch with the spice mixture. I chose not to use cilantro. I love it. However, my sons do not enjoy it's yumminess.
I then mixed the cooled okra with the tomatoes, red onion and ended with the juice of a lemon. Even though the okra was fried, it was light in taste and is truly a salad.

Now I wonder how the okra would handle being baked or roasted until its dark and crispy. I am going to experiment with that as well and will also try it with curry.

I am also sending this dish in to The Side dish showdown.


My next trip to the capital, "big city", I hope to find the Chaat Masala, or the ingredients to make my own.

**When frying the okra sliced this way, beware: The seeds may pop out of the skillet. Throw in a handful at a time and cook in batches. No need to turn the okra or stir it.


Okra Salad (Adapted from Mark Bittman)

Ingredients
Neutral oil, like corn or canola, for frying
1 pound okra, stemmed and julienned lengthwise
½ small red onion, thinly sliced
2 small or 1 medium tomato, cored, seeded, and julienne sliced
¼ cup chopped fresh cilantro leaves, for garnish
½ lemon, or more as needed
1½ teaspoons Chaat Masala, store bought or homemade, or more to taste
½ teaspoon salt, or more to taste
Directions
1. Heat at least 2 inches oil to 350°F (you can check this with a deep-fry or instant-read thermometer) in a countertop deep fryer or in a heavy pot on the stove.
2. Fry the julienned okra in batches small enough not to crowd your pan or fryer and make sure to let the oil return to temperature (350°F) between batches. Fry it until crisp, 5 to 7 minutes—the seeds will swell and it will be deeply colored at the edges—then transfer to drain on paper towels.
3. Toss the okra together with the onion, tomato, and cilantro, squeeze the lemon juice over all, and season to taste with Chaat Masala and salt.

Side Dish Showdown Blogger Event

Thursday, June 10, 2010

No Knead Bread


This week at IHCC it is potluck week again! I have many Mark Bittman recipes saved and on my "to do" list, So many recipes, so many possibilities. This week I chose Bittman's No Knead Bread and I chose this recipe for several different reasons. 1. It is an easy recipe. 2. It's practically "Hands off"3. The smell of hot bread is wonderful. 4. I am not a "baker" usually and this read as a no fail recipe.

Preparing the mix and walking away for so many hours was easy. (I recall doing the same with the overnight waffles.) I did let the mix rest, sit and work for 19 hours.
The most difficult part of this recipe was the wait. We could not wait to slather the loaf with butter, jam or jelly.

Adding sesame seeds to the top of the dough really worked well and tasted delish. I will experiment more with this recipe and see how adding different herbs and some spice will work out. However, on its own the bread was delicious!


No Knead Bread (Mark Bittman)

  • 3 cups All purpose flour (or bread flour), more for dusting
  • 1/4 teaspoon Instant yeast
  • 1 1/4 teaspoons Salt
  • Cornmeal (or wheat bran), as needed
  • 1 5/8 cups Water


1. In a large bowl combine flour, yeast and salt. Add 1 5/8 cups water, and stir until blended; dough will be shaggy and sticky. Cover bowl with plastic wrap. Let dough rest at least 12 hours, preferably about 18, at warm room temperature, about 70 degrees.

2. Dough is ready when its surface is dotted with bubbles. Lightly flour a work surface and place dough on it; sprinkle it with a little more flour and fold it over on itself once or twice. Cover loosely with plastic wrap and let rest about 15 minutes.

3. Using just enough flour to keep dough from sticking to work surface or to your fingers, gently and quickly shape dough into a ball. Generously coat a cotton towel (not terry cloth) with flour, wheat bran or cornmeal; put dough seam side down on towel and dust with more flour, bran or cornmeal. Cover with another cotton towel and let rise for about 2 hours. When it is ready, dough will be more than double in size and will not readily spring back when poked with a finger.

4. At least a half-hour before dough is ready, heat oven to 450 degrees. Put a 6- to 8-quart heavy covered pot (cast iron, enamel, Pyrex or ceramic) in oven as it heats. When dough is ready, carefully remove pot from oven. Slide your hand under towel and turn dough over into pot, seam side up; it may look like a mess, but that is okay. Carefully shake pan (it's hot) once or twice if dough is unevenly distributed; it will straighten out as it bakes. Cover with lid and bake 30 minutes, then remove lid and bake another 15 to 30 minutes, until loaf is beautifully browned. Cool on a rack.

Thursday, June 3, 2010

Pork Chops with Sage and Balsamic Vinegar


This week's them at IHCC is Herbs. So many herbs and so little thyme. (insert laugh, or snicker).

I chose Mark Bittmans Pork Chops with Sage and Balsamic vinegar.

Sage is the herb that reminds me of cornbread dressing and country sausage. I wanted to see just how sage would taste prepared differently than what my family is accustomed to. It is a wonderful, smokey and savory herb!

My youngest son came into the kitchen as I prepared dinner and said. "I smell sausage. Mom are we having sausage for dinner?" He was disappointed that he was not having waffles and sausage for dinner. However, he did eat all of his sage covered pork chop.


I soaked the chops in a brine for a few hours.

Pork Chops with Sage and Balsamic

- serves 2 -
Adapted from Mark Bittman

Ingredients

2 not-too-thick pork chops
1 tablespoon neutral oil, such as canola
1/4 teaspoon sugar
6-8 sage leaves, roughly chopped
Balsamic vinegar to taste
Salt and pepper

Procedure

1. If at all possible, salt the chops a few hours before cooking, though it's not necessary. Make sure the chops are very dry, then rub with the sugar and salt (to your liking) on both sides. Add the oil to a cold pan and lay the pork chops down, pressing firmly. Turn on the heat to medium and cook, undisturbed, for 5 to 6 minutes.

2. Flip the chops and cover, cooking on the other side for an additional 2 to 3 minutes until the pork is cooked through.

3. Uncover, remove the chops, and add the sage leaves. Increase the heat to high and scrape up any pan drippings as the sage gets slightly crisp.

4. Drizzle the pork chops with the pan sauce and balsamic vinegar, to taste. Crack fresh black pepper and serve immediately.

Search This Blog